1) Open the font cover and press the [Clear] button
2)To confirm you are installing a new drum press the up arrow.
3) When the LCD screen shows "Accepted", close the front cover.
FOR HL PRINTERS:
1) Open the cover
2) Press and hold the [Go] button for 4 seconds.
3) Once all four LEDs are lit, release the [Go]
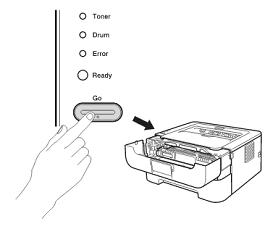
Close the front cover and make sure the Drum LED is off
FOR INTELLIFAX AND MFC PRINTERS:
1) Open the font cover and press the [Clear] button
2) Press 1 to confirm you are installing a new drum unit.
3) When the LCD screen shows "Accepted", close the front cover.


FOR ALL PRINTERS:
1. Turn on the printer.
2. Press the up or down arrows to select the following:
3. Then, select [Machine Info.] and press OK.
4. Select [Parts Life] and press OK.
5. Select [Drum] and press OK.
6. Then, press and hold “OK” for 5 seconds.
7. Press the up arrowto select [Reset].


After installing the new drum leave the front door of the printer open
FOR DCP AND MFC PRINTERS:
Press the [Clear/Back] button.
The LCD screen will show
Press [1] to reset the drum counter
The LCD screen will display
"Accepted"
You may now close the printer door and your printer drum counter is set to 100%
FOR HL PRINTERS:
Press the Blue [Go] button until all the lights light up then release the button.
Close the door and your drum life counter is reset to 100%.


Every time you install a new Brother DR-620 Drum you must manually reset the printer drum counter to 100% using the following instructions.
After swaping the Brother TN-650 or TN-620 toner into the new DR 620 drum install the units in the printer and leave the front door to the printer open.
FOR DCP AND MFC PRINTERS:
With the printer door open press the [Clear/Back] button.
The LCD screen will display
Press [1] to reset the drum counter
The LCD screen will display
"Accepted"
You may now close the printer door and your printer drum counter is set to 100%
FOR HL PRINTERS:
Press the Blue [Go] button until all the lights light up then release the button.
Close the door and your printer drum life counter is reset to 100%.


Swap your toner cartridge into the new drum, install the new drum and toner into the printer, and leave the front door open
With the front cover open pess the [Clear] button.
The LCD screen will show
Press [1] to reset the drum counter
The LCD screen will show
"Accepted"
You may now close the printer door and your drum counter is set to 100%
FOR HL PRINTERS:
Swap your toner cartridge into the new drum, install the new drum and toner into the printer, and leave the front door open
Press the green [Go] button until all the lights light up then release the button.
Close the door and your drum life counter is reset to 100%.


The reset gear on the toner cartridge did not properly contact and reset the New Toner Sensor within the
printer. The reset gear will operate only once after the toner cartridge is installed and the position of the
gear cannot be reset after installation. To reset the Toner Life Display, a manual reset procedure must
be performed.
Solution:
The following steps will need to be performed to manually reset the Toner Life Display
TN-110BK,C,M,Y (Standard Yield) Toner Reset Instructions
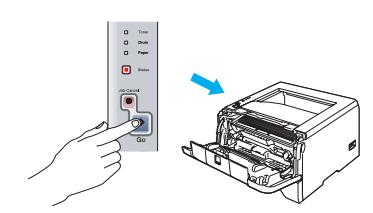
- Open the front cover then press the reprint and cancel buttons at the same time.
- “Reset Parts Life” appears on the LCD display. Press the up or down arrow button to select the toner cartridge that needs to be reset.
B.TNR-S – Black
C.TNR-S – Cyan
M.TNR-S – Magenta
Y.TNR-S – Yellow
- After selecting the appropriate toner cartridge press OK. The toner life has been reset.
- Close the front cover and the operation has now been completed.
TN-115BK,C,M,Y (High Yield) Toner Reset Instructions
- Open the front cover then press the reprint and cancel buttons at the same time.
- “Reset Parts Life” appears on the LCD display. Press the up or down arrow button to select the toner cartridge that needs to be reset.
B.TNR-H – Black
C.TNR-H – Cyan
M.TNR-H – Magenta
Y.TNR-H – Yellow
- After selecting the appropriate toner cartridge press OK. The toner life has been reset.
- Close the front cover and the operation has now been completed.


1. Open the front cover.
2. Press and hold Secure Print and Cancel at the same time. You will see "K-TNR-STD" display on the screen.
3. Using the + and - buttons select the toner you want to reset.
4. Press the Ok button.
5. It will display Ok? and hit the Ok button again to reset the toner.
6. Close the lid.


HL-3140CW, HL-3150CDN, HL-3150CDW, HL-3170CDW
- Open the front cover of the printer (to access cartridges).
- With the front cover open, simultaneously press the Secure and Cancel buttons.
- The reset menu will now appear on the LCD display.
- Scroll through the menu to select a color and yield to reset.
- The LCD will read "Accepted" once the reset is complete.
DCP-9020CDW, MFC-9130CW, MFC-9140CDN, MFC-9330CDW, MFC-9340CDW
- If an error message appears on the LCD display, press the Cancel (X) button to show the main menu.
- Press the Fax button to make the numeric keypad visible. Then, locate and only locate the Asterisk (Star) button on the numeric keypad. It is important to remember its location as it will not be lit up later when needed.
- Press the Home button to return to the main menu.
- Open the front cover of the printer (to access cartridges).
- With the front cover open, press and hold the unlit Asterisk (Star) button for 5 seconds.
- The reset menu will now appear on the LCD display.
- Scroll through the menu to select a color and yield to reset.
- The LCD will read "Accepted" once the reset is complete.


MFC-9460CDN & MFC-9560CDW Printers:
1. Open the front cover.
2. The display should read “Cover Open”.
3. Press the “Clear” button.
4. “Reset Menu” appears on the LCD display. Press the up or down arrow button to select the toner cartridge that needs to be reset.
TN-310BK, C, M, Y (Standard Yield) Toner
K.TNR-STD – Black
C.TNR-STD – Cyan
M.TNR-STD – Magenta
Y.TNR-STD – Yellow
TN-315BK, C, M, Y (High Yield) Toner
K.TNR-HC – Black
C.TNR-HC – Cyan
M.TNR-HC – Magenta
Y.TNR-HC – Yellow
5. After selecting the appropriate toner cartridge press OK.
6. Press “1”for reset and then the display will show accepted.
7. Press the Stop/Exit button.
8. Close the front cover and the operation has now been completed.
MFC-9970CDW Printer:
1. Open the front cover.
2. The display should read “Cover Open”.
* If the display doesn’t show Cover Open. Press Stop/Exit; close the front cover. While the display shows “Please Wait” open the front cover and the display will show “Cover Open”*
3. Press the “1” button.
4. “Reset Menu” appears on the LCD display. Press the up or down arrow button to select the toner cartridge that needs to be reset.
TN-310BK, C, M, Y (Standard Yield) Toner
K.TNR-STD – Black
C.TNR-STD – Cyan
M.TNR-STD – Magenta
Y.TNR-STD – Yellow
TN-315BK, C, M, Y (High Yield) Toner
K.TNR-HC – Black
C.TNR-HC – Cyan
M.TNR-HC – Magenta
Y.TNR-HC – Yellow
5. After selecting the appropriate toner cartridge press OK.
6. Press “1”for reset and then the display will show accepted.
7. Press the Stop/Exit button.
8. Close the front cover and the operation has now been completed.
HL Printer Series
1. Open the front cover.
2. Press the “Secure” and “Cancel” buttons at the same time.
3. “Reset Menu” appears on the LCD display. Press the up or down arrow button to select the toner cartridge that needs to be reset.
TN-310BK, C, M, Y (Standard Yield) Toner
K.TNR-STD – Black
C.TNR-STD – Cyan
M.TNR-STD – Magenta
Y.TNR-STD – Yellow
TN-315BK, C, M, Y (High Yield) Toner
K.TNR-HC – Black
C.TNR-HC – Cyan
M.TNR-HC – Magenta
Y.TNR-HC – Yellow
4. After selecting the appropriate toner cartridge press OK.
5. Press the Up Arrow for reset and then the display will show accepted.
6. Press the Stop/Exit button.
7. Close the front cover and the operation has now been completed.


printer. The reset gear will operate only once after the toner cartridge is installed and the position of the
gear cannot be reset after installation. To reset the Toner Life Display, a manual reset procedure must
be performed.
Please verify the following before attempting a manual reset of the Toner Life Display
• The toner cartridge is not a “starter toner cartridge”
Solution:
The following steps will need to be performed to manually reset the Toner Life Display
1. Open the front cover to the toner/drum section of the printer
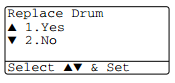
2. Press the Clear/Back button and the following message should appear in the LCD display “Replace Drum? 1. Yes 2. No”
3. RESET THE COUNTER IN THE FOLLOWING PROCEDURE BY PRINTER MODEL AND TONER TYPE
MFC models with numeric keypads
- TN420 standard toner: Press the *, 1 and 1 button in this order
- TN450 high yield toner: Press the *, 1 and 2 button in this order
- Unknown Toner Type: Press the *, 0 and 0 button in this order
DPC models without numeric keypads
- TN420 standard toner: Press the “Start” button, and press “arrow up” or “arrow down”
button to display “11” on the LCD display. Then press the “OK” button. - TN450 high yield toner: Press the “Start” button, and press “arrow up” or “arrow down”
button to display “12” on the LCD display. Then press the “OK” button. - Unknown Toner Type: Press the “Start” button, and press “arrow up” or “arrow down”
button to display “00” on the LCD display. Then press the “OK” button
The message “Accepted” should be appear on the LCD display.
4. After 2 seconds, “Cover Open” will appear on the LCD display.
5. Close the front cover and the operation is now completed.
HL Series
The following steps will need to be perform to manually reset the Toner error LED
1. Turn off power to the printer
2. Open the front cover to the toner/drum section of the printer
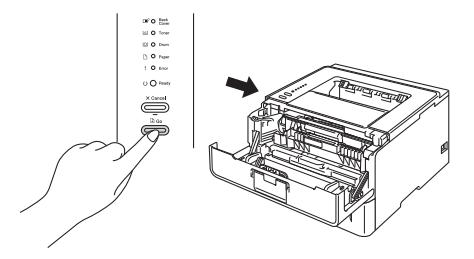
3. Press and hold the “Go” button while turning on power to the printer
4. Release the “Go” button after “Toner, Drum, Error” LEDs turn on with the “Ready”
LED turn off. “All LEDs will now be OFF”
5. Press the “Go” button 2 times – “The Toner, Drum and Error LEDs will turn ON”
6. Press the “Go” button 6 times for a TN420 or Press the “Go” button 7 times for TN450
7. Close the front cover after Error LED starts to flash
8. The reset procedure has been completed