1. Remettez l'imprimante sous tension.
2. Appuyez sur + ou - pour choisir "Info machine"
3. Appuyez sur OK pour passer au niveau de menu suivant, puis appuyez sur + ou - pour choisir "Réinitialiser la durée de vie des pièces".
4. Appuyez sur OK, puis sur + pour choisir "Unité de tambour".
5. Appuyez sur OK, puis sur + ou - pour choisir la couleur que vous avez remplacée.
6. Appuyez deux fois sur OK.
Modèles MFC
1. Appuyez sur Menu => Info machine. => Réinitialiser le menu.
2. Appuyez sur les flèches haut ou bas pour choisir la couleur du tambour que vous avez remplacé.
3. Appuyez sur OK.
4. Appuyez sur 1 pour réinitialiser le compteur de tambour.
5. Appuyez sur Stop / Exit.


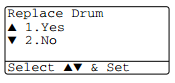
1) Ouvrez le capot avant et Appuyer sur "Efface" ou "Clear",
2) l'inscription "Changer tambour 1.Oui 2.non" va apparaître sur l'écran. Appuyez sur "1" ; lorsque l'imprimante indique "confirme", vous pouvez refermer le capot, l'imprimante est prête
IMPRIMANTES HL:
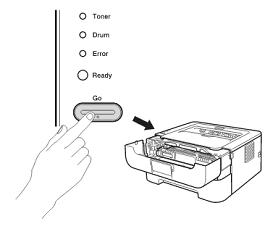
1) Gardez le capot ouvert puis appuyer sur la touche verte ou bleu "go" 5 secondes.
2) Une fois l'ensemble des diodes allumées puis éteintes, vous pouvez refermer le capot, l'imprimante est prête.


POUR TOUS LES MODELES:
1. Remettez l'imprimante sous tension.
2. Appuyez sur + ou - pour choisir "Info machine"
3. Appuyez sur OK pour passer au niveau de menu suivant, puis appuyez sur + ou - pour choisir "Réinitialiser la durée de vie des pièces".
4. Appuyez sur OK, puis sur + pour choisir "Unité de tambour".
6. Appuyez et tenez OK 5 secondes.
7. Appuyez fleche du haut et selectionnez [Reset].


IMPRIMANTES DCP ET MFC:
Appuyez sur Supprimer/Retour (Clear/Back)
L'écran ACL affiche
Appuyez sur [1] oui
L'écran ACL affiche "CONFIRMÉ"
Fermez le couvercle avant
IMPRIMANTES HL:
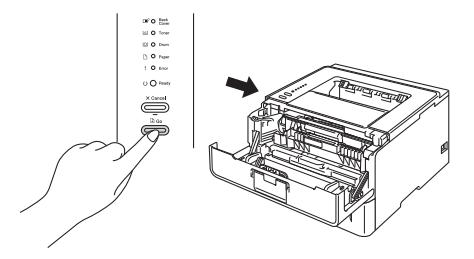
Appuyez sur la touche [Go] et maintenez-la enfoncée pendant environ 4 secondes jusqu'a ce que les témoins s'allument, Quand les quatre témoins sont allumés, relachez la touche GO
Fermez le couvercle avant


IMPRIMANTES DCP ET MFC:
Appuyez sur Supprimer/Retour (Clear/Back)
L'écran ACL affiche
Appuyez sur [1] oui
L'écran ACL affiche "CONFIRMÉ"
Fermez le couvercle avant
IMPRIMANTES HL:
Appuyez sur la touche [Go] et maintenez-la enfoncée pendant environ 4 secondes jusqu'a ce que les témoins s'allument, Quand les quatre témoins sont allumés, relachez la touche GO
Fermez le couvercle avant


Swap your toner cartridge into the new drum, install the new drum and toner into the printer, and leave the front door open
With the front cover open pess the [Clear] button.
The LCD screen will show
Press [1] to reset the drum counter
The LCD screen will show
"Accepted"
You may now close the printer door and your drum counter is set to 100%
FOR HL PRINTERS:
Swap your toner cartridge into the new drum, install the new drum and toner into the printer, and leave the front door open
Press the green [Go] button until all the lights light up then release the button.
Close the door and your drum life counter is reset to 100%.


1. Ouvrir la porte avant
2. Pesez sur le bouton Clear/Back, et vous verrez apparaitre à l’écran (Reset Menu)
3. Avec le bouton flèche en bas, localisez la cartouche que vous voulez réinitialiser. La première lettre représente la couleur, TNR pour Toner et les dernières lettres le volume d’encre
4. Une fois votre cartouche sélectionnée, appuyer sur le bouton # 1 pour réinitialiser la cartouche. Ensuite appuyer sur le bouton # 2 pour quitter
5. Fermer la porte et votre imprimante est prête.
IMPRIMANTES HL:
1. Ouvrez le capot avant de votre imprimante.
2. Appuyez sur la touche "CLEAR / BACK" de l'imprimante.
3. Lorsque ‘ Reset Parts Life ‘ apparait, utilisez les flèches pour sélectionner le toner que vous voulez réinitialisée. La première lettre représente la couleur, TNR pour Toner et les dernières lettres le volume d’encre.
4. Une fois la cartouche sélectionnée, appuyez sur le bouton ‘ OK ‘.
5. Il ne vous reste qu’à fermer la porte et votre imprimante est prête.


1. Ouvrir la porte avant
2. Pesez sur le bouton Cancel et Secur Print, et vous verrez apparaitre à l’écran (K.TNR-STD) Avec le bouton flèche en bas, localisez la cartouche que vous voulez réinitialiser. La première lettre représente la couleur, TNR pour Toner et les dernières lettres le volume d’encre.
3. Une fois votre cartouche sélectionnée, pesez sur le bouton OK pour sélectionner la cartouche et à nouveau OK pour accepter la modification. Il ne vous reste qu’à fermer la porte et votre imprimante est prête.
Modèles MFC
1. Ouvrez le capot avant
2. Appuyez sur la touche "CLEAR / BACK" dans l'imprimante.
3. Utilisez les flèches pour sélectionner toner que vous voulez réinitialisé. La première lettre représente la couleur, TNR pour Toner et les dernières lettres le volume d’encre.
4.Une fois votre cartouche sélectionnée, pesez sur le bouton OK pour sélectionner la cartouche choisi.
5. Sélectionnez l'option #1 "Reset" pour réinitialisée votre cartouche.
6. LCD indique «accepté»
7. Il ne vous reste qu’à fermer la porte et votre imprimante est prête.
HL-3140CW, HL-3150CDN, HL-3150CDW, HL-3170CDW
- Ouvrez le capot de l’imprimante (l’accès aux cartouches).
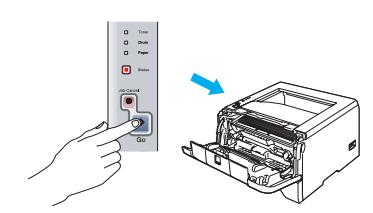
- En gardant le capot ouvert, appuyez simultanément les boutons Sécuritaire (Secure) et Annuler (Cancel).
- Le menu de réinitialisation apparaîtra à l’écran. Avec le bouton flèche en bas, localisez la cartouche que vous voulez réinitialiser.
- D) Une fois votre cartouche sélectionnée, pesez sur le bouton OK pour sélectionner la cartouche et à nouveau OK pour accepter la modification.
- E) L’écran affichera Accepté (Accepted) une fois la réinitialisation complétée.
DCP-9020CDW, MFC-9130CW, MFC-9140CDN, MFC-9330CDW, MFC-9340CDW
- S’il y a un message d’erreur à l’écran, appuyez sur le bouton Annuler (X) pour retourner au menu principal.
- Appuyez sur le bouton Fax afin de rendre visible le clavier numérique. Ensuite, ne faites que repérer la position du bouton Étoile (*) du clavier numérique. Il faudra retenir sa position, car il ne sera pas allumé dans les prochaines étapes.
- Appuyez sur le bouton Accueil (Maison) afin de retourner au menu principal.
- Ouvrez le capot de l’imprimante (l’accès aux cartouches).
- En gardant le capot ouvert, tenez appuyé le bouton Étoile pendant 5 secondes. Notez que le bouton ne sera pas allumé.
- Le menu de réinitialisation apparaîtra à l’écran.
- Parcourez le menu afin de choisir une couleur et un rendement à réinitialiser. Une fois votre cartouche sélectionnée, pesez sur le bouton OK pour sélectionner la cartouche et à nouveau OK pour accepter la modification.
- L’écran affichera Accepté (Accepted) une fois la réinitialisation complétée.


1. Ouvrir la porte avant
2. Pesez sur le bouton Clear, et vous verrez apparaitre à l’écran (Reset Menu)
3. Avec le bouton flèche en bas, localisez la cartouche que vous voulez réinitialiser. La première lettre représente la couleur, TNR pour Toner et les dernières lettres le volume d’encre.
4. Une fois votre cartouche sélectionnée, pesez sur le bouton OK pour sélectionner la cartouche et à nouveau OK pour accepter la modification.
5. Fermer la porte et votre imprimante est prête.
IMPRIMANTES HL:
1. Ouvrir la porte avant
2. Pesez sur Cancel Et Secure simultanément, et vous verrez apparaitre à l’écran (Reset Menu)
3. Avec le bouton flèche en bas, localisez la cartouche que vous voulez réinitialiser. La première lettre représente la couleur, TNR pour Toner et les dernières lettres le volume d’encre.
4. Une fois votre cartouche sélectionnée, pesez sur le bouton OK pour sélectionner la cartouche et sur (fleche en haut) pour accepter la modification.
5. Fermer la porte et votre imprimante est prête.


]]>